Thursday, May 29, 2008

Increase Transaction Timeout in MSDTC

For those of you who work with either .NET Enterprise Services or the System.Transaction Namespace a common problem is that in debug mode when the number of application layers increases the transaction times out.

This could also be the case when you have large number of distributed DML (Data Manipulation Language) Statements inside a transaction context.

To solve this problem you would need to increase the Transaction Timeout in MSDTC Component Services.

To do this open Control Panel - > Administrative Tools -> Component Services.

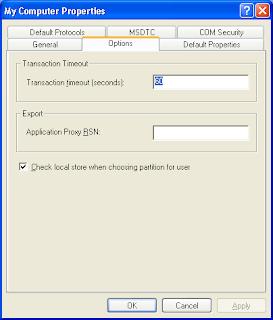
Open the tree view and locate My Computer Node, right click this and open properties on the Options Tab change the timeout value in seconds.


Happy Programming
Anton

Labels:

Wednesday, May 21, 2008

Running .NET 2.0 Web Applications under Higher Privileges in Windows XP

Since the application pool concepts for IIS 6 and above does not exist in Windows XP, creating applications that require higher privileges becomes a problem.


Usually in the development environment the developer wants to try out different things and would like to have higher privileges for the .NET Web applications like writing to the message queue, event log, registry and so on.


In order to do that there are a number of security settings that needs to be given to each resources that .net Web application tries to access using the default account (aspnet)


Instead of granting permission based on need we can give a blanket permission which would enable to perform these actions without any security error.


open machine.config present under C:\WINDOWS\Microsoft.NET\Framework\v2.0.50727\Config and navigate to
<system.web>
    <processModel autoConfig="true" />


open machine.config.comments also present in the same directory and navigate to <processModel. There would two nodes one inside a comment block and the other outside the comment block in a single line.


Copy this line from machine.config.comments and replace the corresponding node in machine.config.


Now on the processModel element change the attribute userName="machine" to userName="SYSTEM" account. This change would now direct .NET web application to use the SYSTEM Account. You don't have to specify a password as this is controlled by the OS. You can also give other accounts if you desire by make sure you also specify the password.


Restart IIS or reboot the system for the changes to take effect.


Now you have access to perform actions which were restricted before.


Happy Programming,

Anton


Note:

Please backup all framework config files before editing them

Labels: